- The Panzer General’s grandson: an introduction to Wargame: European Escalation
- Attack, defence, and the art of Wargame
- Wargame: European Escalation – The Verdict
- Wargame: European Escalation – 40% off sale & content patch
- What we know about Wargame: AirLand Battle
- Wargame: AirLand Battle: opening a box of virtual chocolates
- Wargame: AirLand Battle: right troops, right place, right time
- Let’s defend Scandinavia in Wargame: AirLand Battle! Part 1: Something Rotten in Denmark
- Let’s defend Scandinavia in Wargame: AirLand Battle! Part 2 (FINAL): Who Dares, Wins
- Wargame: AirLand Battle — The Verdict
- If your Wargame ain’t broke…
- The Beginner’s Guide to Wargame
Wargame is one of my favourite RTS series. It can also be daunting — I know several readers have picked it up on sale, only to bounce off. I hope the following guide will help.
Introduction to Wargame
Wargame is a series of real-time military tactics games (European Escalation, AirLand Battle, and Red Dragon) set during the Cold War. Like Total War or a real-time Panzer General, Wargame bridges the gap between dedicated simulations and traditional real-time strategy games such as Company of Heroes. It’s also really, really good.
If you don’t own any of the games, I don’t recommend the original game, European Escalation, which has been superseded by its sequels. Instead, I recommend starting with the middle game, AirLand Battle. First, AirLand is much cheaper than the latest game, Red Dragon. At the time of writing AirLand regularly goes on sale for <$10, while Red Dragon, even on sale, is seldom cheaper than the mid-$20s. Second, AirLand introduced many of the series’ best and most distinctive mechanics — the jump to Red Dragon is more modest. If you plan to play a lot of competitive multiplayer, you may wish to start with Red Dragon, where the multiplayer community has migrated. Otherwise, start with ALB, and if you enjoy it, upgrade to Red Dragon later.
The rest of this guide assumes you are playing either AirLand Battle or Red Dragon. The guide is current as at v564 (DLC 1) of Red Dragon.
Getting started
AirLand Battle and Red Dragon both ship with tutorials (interactive for AirLand, text/screenshot for Red Dragon). I don’t think they’re very good, although the AirLand tutorial will teach you the basics of movement.
Instead, I recommend jumping straight in. There are three ways to play Wargame — skirmish, multiplayer, and the dynamic campaigns. Before a skirmish or multiplayer match, you can customise your army via a “deck-building” screen, and this is where Wargame derives its replayability. If you’d like to try deck-building, skip to the bottom of this post, where I’ve created a few sample decks together with explanations. Once you’ve saved your deck, return to this section and go to the next paragraph. Otherwise, we’ll use a pre-made deck.
For your first battle, we’ll start with a 2v2 skirmish match. Give yourself a ‘very hard’ AI sidekick, and set the two AI players to ‘easy’ — this affects the resource bonus each AI player will receive. If you’re playing AirLand Battle, set each AI player to an armoured or mechanised deck (which will produce a combined-arms battle), and set the two enemy AI players to one of East Germany, Denmark, or Norway — these countries have older, more limited equipment than the great powers.
There is one more important choice during setup. There are two ways to win a Wargame match: either destroy all your opponent’s command units, or beat the enemy on points. How you earn points is determined by which game mode you select:
1. Destruction mode – kill enemy units to earn points. Controlling territory increases income, but doesn’t directly contribute to victory. This is the mode used by the campaign, and it is also the default for skirmish.
2. Conquest mode – victory is awarded based on territory controlled.
I usually prefer Conquest. Against humans, Destruction can encourage stalemates. Against the AI, Conquest is harder but also more rewarding — Destruction plays to the computer’s weakness (a tendency to charge headlong at defenders), while Conquest plays to its strength (its resource bonus).
For now, choose either mode and set a time limit. If one side hits its point quota, the match will end immediately. Otherwise, the winner will be the side with more points when time runs out. I recommend setting a reasonably generous point requirement and a 40-minute timer, so that battles can swing back and forth instead of being decided in the first skirmish.
Note: If you play Destruction mode, I strongly recommend using a timer, especially when playing against a human. Untimed Destruction, even more than basic Destruction, encourages players to hunker down and turtle. In contrast, the presence of a timer spurs the losing player to do something.
Your first battle
Before the match begins, you can study the map and set up your army:
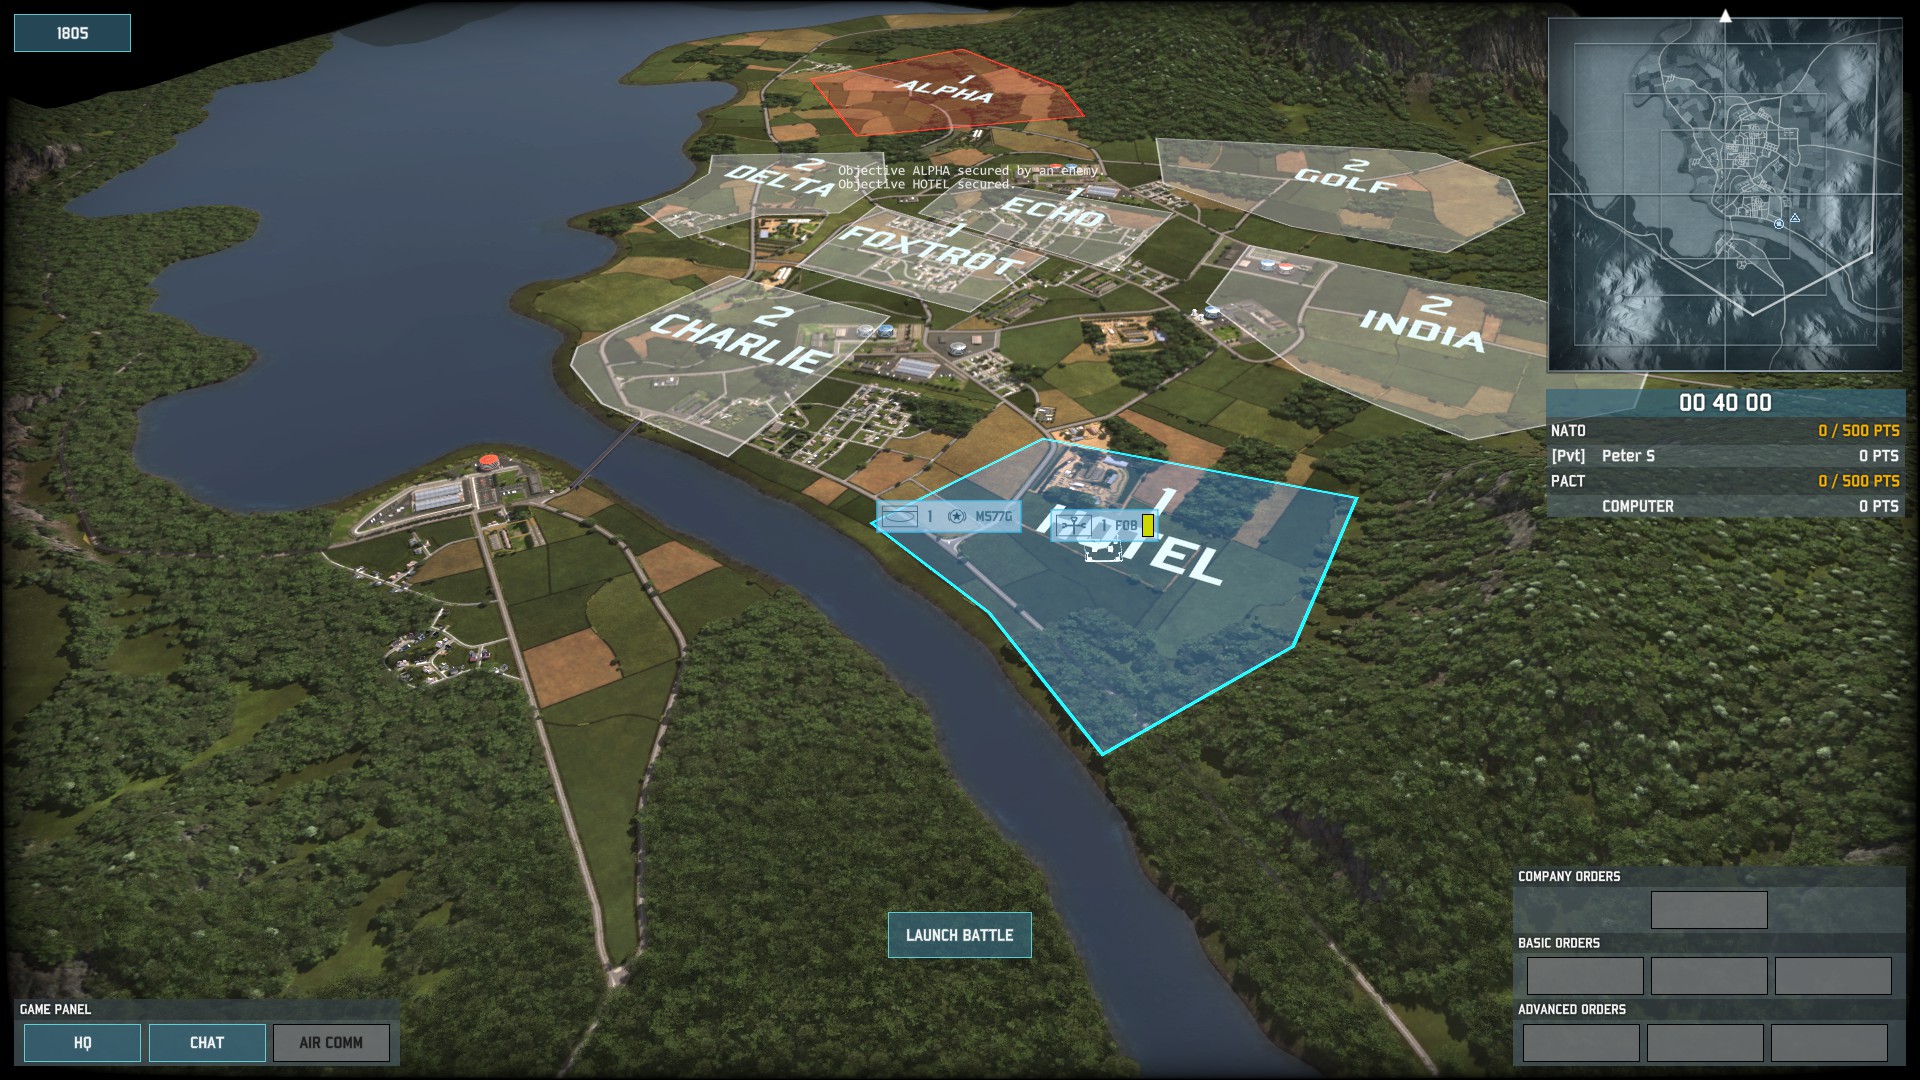
Start by identifying the lines you plan to hold, based on terrain, objectives, choke points, and ease of reinforcement. Territorial control matters: the map is divided up into zones, which provide income (Destruction mode) or victory points (Conquest mode). Each zone is marked with a number, indicating how much it’s worth. Zones with arrows allow reinforcements to be called in. Most zones begin unclaimed, and in a Conquest game, it is crucial that you hold enough to be ahead on victory points. At the same time, don’t push too far forward unless you are attempting an all-out rush. As you move further away from your initial spawn (with its reinforcement arrow), your reinforcements will take longer to reach the front, while the enemy’s will take less time. For now, plan on securing a slight majority of the map — for instance, by holding 5 points’ worth of zones if there are 9 points total.
Next, it’s time to choose your starting forces. The next section goes into more detail on unit selection. For now, here are a few tips:
* Choose the right units for each objective. As a general rule, tanks and long-ranged missile units dominate open fields, while infantry (especially special forces and flamethrowers) dominate cities and forests.
* As it’s easier to defend than attack, matches begin with a scramble for objectives. One common opening relies on cheap, speedy units, such as infantry in helicopters or fast APCs, that can establish a perimeter while more powerful reinforcements trundle up. Infantry armed with anti-tank missiles, such as NATO’s MILAN, work well as part of your fast opening force.
* Recon units are essential: bring several in your starting line-up. The maps are very large, most units can shoot farther than they can see, and both human and AI opponents love to sneak up on unguarded flanks — in AirLand Battle, the AI even knows the position of your units. The solution is recon. I like to bring a mix of recon helicopters (vulnerable but with the longest sight range), ground vehicles (which can keep up with my other units), and infantry (cheap and stealthy).
* Guard each column with a couple of mobile anti-aircraft units, such as the West German Gepard or the American PIVADS. If you have the points, it may not hurt to also buy a few of the slower, longer-ranged anti-aircraft units, such as the American I-HAWK. Station these a little further behind your lines.
* Command units are crucial. You will start with a command unit, distinguished by the star next to its name. These are the only units that can capture zones, and if you lose all your command units, you’ll lose the match. Deploy enough command units to secure your chosen objective zones, and don’t forget to guard them!
* Don’t forget logistics; your troops will need to be refuelled and rearmed. Purchase a few supply trucks from the “LOG” (logistics) tab and send them with your columns. Once the match begins, you can refill empty supply trucks by bringing them back to your Forward Operating Base (FOB).
* Keep 100-200 deployment points in reserve, in case there are any surprises.
When you’re ready, start the match. Note the “Move Fast” button on the right of the screen, which orders your units to take the fastest route along roads. At the start of the game, time is of the essence – order your units to “move fast” to their chosen objectives. Don’t forget to hit the “unload” button so that your helicopters and APCs disembark their infantry!
After a few minutes, you’ll probably encounter the enemy. Here are a few more hints:
* Don’t bunch expensive units. That makes them vulnerable to bombs and artillery. Instead, spread them out a little bit — their ranged weapons will allow them to support each other even at a distance. Think XCOM, not Total War.
* The defender will always win an even fight. Defenders have entrenched infantry, ambush positions, and can use static weapons such as missiles. The attacker’s sole advantage is knowing where and when s/he will attack. Successful attacks usually require either multiple attackers coordinating against a single point in a team game, or else the use of superior recon to identify and punch through a weak spot in the defender’s line.
* Don’t be afraid to fall back if you’re outgunned. By preserving your troops, you place yourself in a better position to return in force later.
* Watch your flanks. And watch out for infantry sneaking through your lines.
* Plan ahead. It takes a long time for units to move into position. While you wait, why not use cheap recon to probe the enemy line?
* Mix up units. A force of cheap and expensive tanks will probably do better than cheap tanks alone, which will lack punch, or expensive tanks alone, which will draw a lot of fire.
* High-end tanks are powerful – and precious. Don’t call them in at the start — they’re too expensive and are overkill early on. And don’t squander them; think heavy cavalry generals in a Total War game. Instead, bring them out later, protect them from air strikes and ambushes, and they will carve a swathe through lesser tanks.
* Aircraft are powerful – and fragile. Helicopters and ground attack aircraft hard-counter most ground units, but are very vulnerable to anti-air units and fighter aircraft! They are best used defensively while you learn the game. At close range, helicopters are also vulnerable to small arms and the machine guns carried by many ground vehicles, so keep your helicopters at a safe distance.
* Don’t forget to support your troops with artillery. AirLand Battle’s artillery can stun or panic enemy units, or deploy smoke shells to screen an attack. Red Dragon’s is more lethal. Conversely, artillery is there to support the rest of the army, not the other way around. Overspending on artillery will come at the expense of the front line.
* Infantry is a special case. Infantry squads will die quickly in the open. Hence, they rely on concealment, or else on the defence boost from being garrisoned in a building — stacks of up to 4 infantry will automatically enter buildings when they move into an urban sector. As noted above, missile infantry can shoot long distances, but needs to be protected against other infantry. Regular infantry squads fight other infantry and use short-ranged rockets to ambush vehicles that get too close. This makes infantry squads “mobile anti-tank minefields” — in other words, they prevent hostile vehicles from traversing towns and forests. Lastly, infantry can march through forests and over mountains to surprise an unwary foe.
* You can check unit stats at any time. Select a unit, then hit the magnifying glass at the bottom of the screen.
* And last of all, recon everywhere!
After the match, you will probably want to tweak your deck in light of lessons learned, in which case refer to the next section (on unit stats). If you haven’t created a deck yet, refer to the bottom of the post, which provides a sample deck for each of AirLand Battle and Red Dragon. When you’re ready, you can move onto the campaign or multiplayer.
Good luck, and enjoy the game!
A quick guide to units
There are a lot of units in Wargame, and it may help to think of each unit as representing a bundle of strengths, capabilities and weaknesses. For instance, a basic APC has one capability, “move troops”, one strength, “cheap”, and several weaknesses: “thin armour” and “poorly armed”. Attaching a missile launcher to the same APC will change “poorly armed” to “well-armed”, but it will still be thinly armoured, and now it will no longer be as cheap. A modern tank combines “well-armed”, “well-armoured”, and “pricey”.
Most ground units can be evaluated on three criteria: speed, armour, and firepower. In the case of recon units, a fourth metric is important – optics, which determines their sight range.
* Speed varies depending on whether you are moving off- or on-road (via the “move fast” command).
* Armour usually ranges between 10-20 for tanks, with older tanks being at the lower end and modern tanks being at the upper end. Red Dragon adds 1990s super-tanks with armour as high as the mid-20s. Any tank with less than around 7-8 is either a museum piece or a dedicated light tank. Other vehicles, such as APCs, have 3 or even less.
* Weapons need a bit more explanation. Weapons can inflict two types of damage: armour piercing (AP) and high explosive (HE). The basic damage formula when firing at vehicles is (Attacker’s AP Power – Defender’s Armour) / 2 + 1. So an AP 17 MILAN missile, aimed at a vehicle with 13 armour, will do (17-13)/2 + 1, for a total of 3 damage. As most armoured vehicles have 10 HP, our 13 armour vehicle can survive three MILANs before being destroyed by the fourth. HE is used to calculate damage against infantry, so a 10-man squad can survive three HE3 shots before being wiped out by the fourth. High-HE artillery and bombs can also suppress, and inflict limited damage upon, armoured targets.
* Cannon-type weapons, whether the large guns on tanks or the autocannons found on some light vehicles and helicopters, are the workhorse of Wargame. Tank guns are long-ranged, usually fire from 7 to 10 times per minute, and are effective against all ground targets. Autocannons lack the punch to penetrate tank armour, but their high rate of fire makes them lethal against infantry and light vehicles. Most cannons carry the kinetic energy, or [KE] tag, which allows them to do more damage the closer they are to their target (as their shells are moving faster upon impact).
* Missiles generally require the shooter to stand still (as seen in the [STAT] tag), have limited ammo, and in the Wargame timeframe, will generally veer off-target if the shooter is killed or suppressed. Think of them like sniper rifles in an FPS – powerful but vulnerable to being swarmed. They are defensive tools, not offensive ones. Fire & forget missiles, marked with the [F&F], tag are a bit more forgiving — these can be fired in volleys, and can still hit even if something happens to the shooter.
* Most tanks in AirLand Battle, and modern tanks in Red Dragon, can fire their cannons on the move. This comes at the cost of reduced accuracy; tanks with a better “stabiliser” stat incur less of a penalty. Stabilised guns, mobility, and thick armour make modern tanks the ideal units for attacking over open ground.
* The lethality of artillery depends on whether you’re playing AirLand Battle or Red Dragon — AirLand’sartillery stuns and debuffs, Red Dragon’s artillery kills.
Artillery comes in several flavours. Mortars are the best workhorse to start with. They are quick-firing and precise, offset by short range and limited firepower. Use them for suppression and deploying smoke. 203mm guns, such as the American M110, pack a punch but fire very slowly; use them to pick off high-value targets such as anti-air batteries and command units. 105mm and 155mm guns sit somewhere in between. Rocket artillery hogs supplies, in exchange for stunning units in a wide area. Some rocket artillery units in Red Dragon carry AP warheads, which makes them more lethal against vehicles but helpless to damage infantry.
* There are three main helicopter weapons: autocannons, anti-tank missiles, and rocket pods. Autocannons and missiles are as described above; note that autocannon helicopters, because of their speed, can be useful against other helicopters. Rocket pods do heavy damage against infantry and light vehicles, and will stun heavier vehicles.
* Aircraft weapons come in a variety of types. Rocket pods and ordinary bombs are a jack of all trades; they will kill infantry, damage vehicles, and stun vehicle crews. Cluster bombs are effective against bunched-up vehicles, but can’t damage infantry. They are best used against the AI, which has a tendency to clump up its vehicles. Anti-tank missiles are best against small numbers of high-value vehicles. Lastly, napalm is the hard counter to entrenched infantry.
* Some anti-aircraft weapons use radar, marked with the [RAD] tag. Beware — these can be spotted and bombed by planes with anti-radar missiles (marked with the [SEAD], or suppression of enemy air defences, tag). If you’re playing against the AI, you don’t have to worry; the AI rarely uses SEAD. Against humans, be prepared to disable the weapons on your radar units if you see SEAD planes incoming.
* Infantry units vary in price and effectiveness depending on their “tier”. In Red Dragon, unit tier (militia/regular/shock/elite) is a visible stat. In AirLand Battle, a general rule is that you get what you pay for: most regular infantry in AirLand is 10 points, while elites are 15-25.
As an illustration, consider these two units: the West German Leopard 2 and the Soviet T-72:
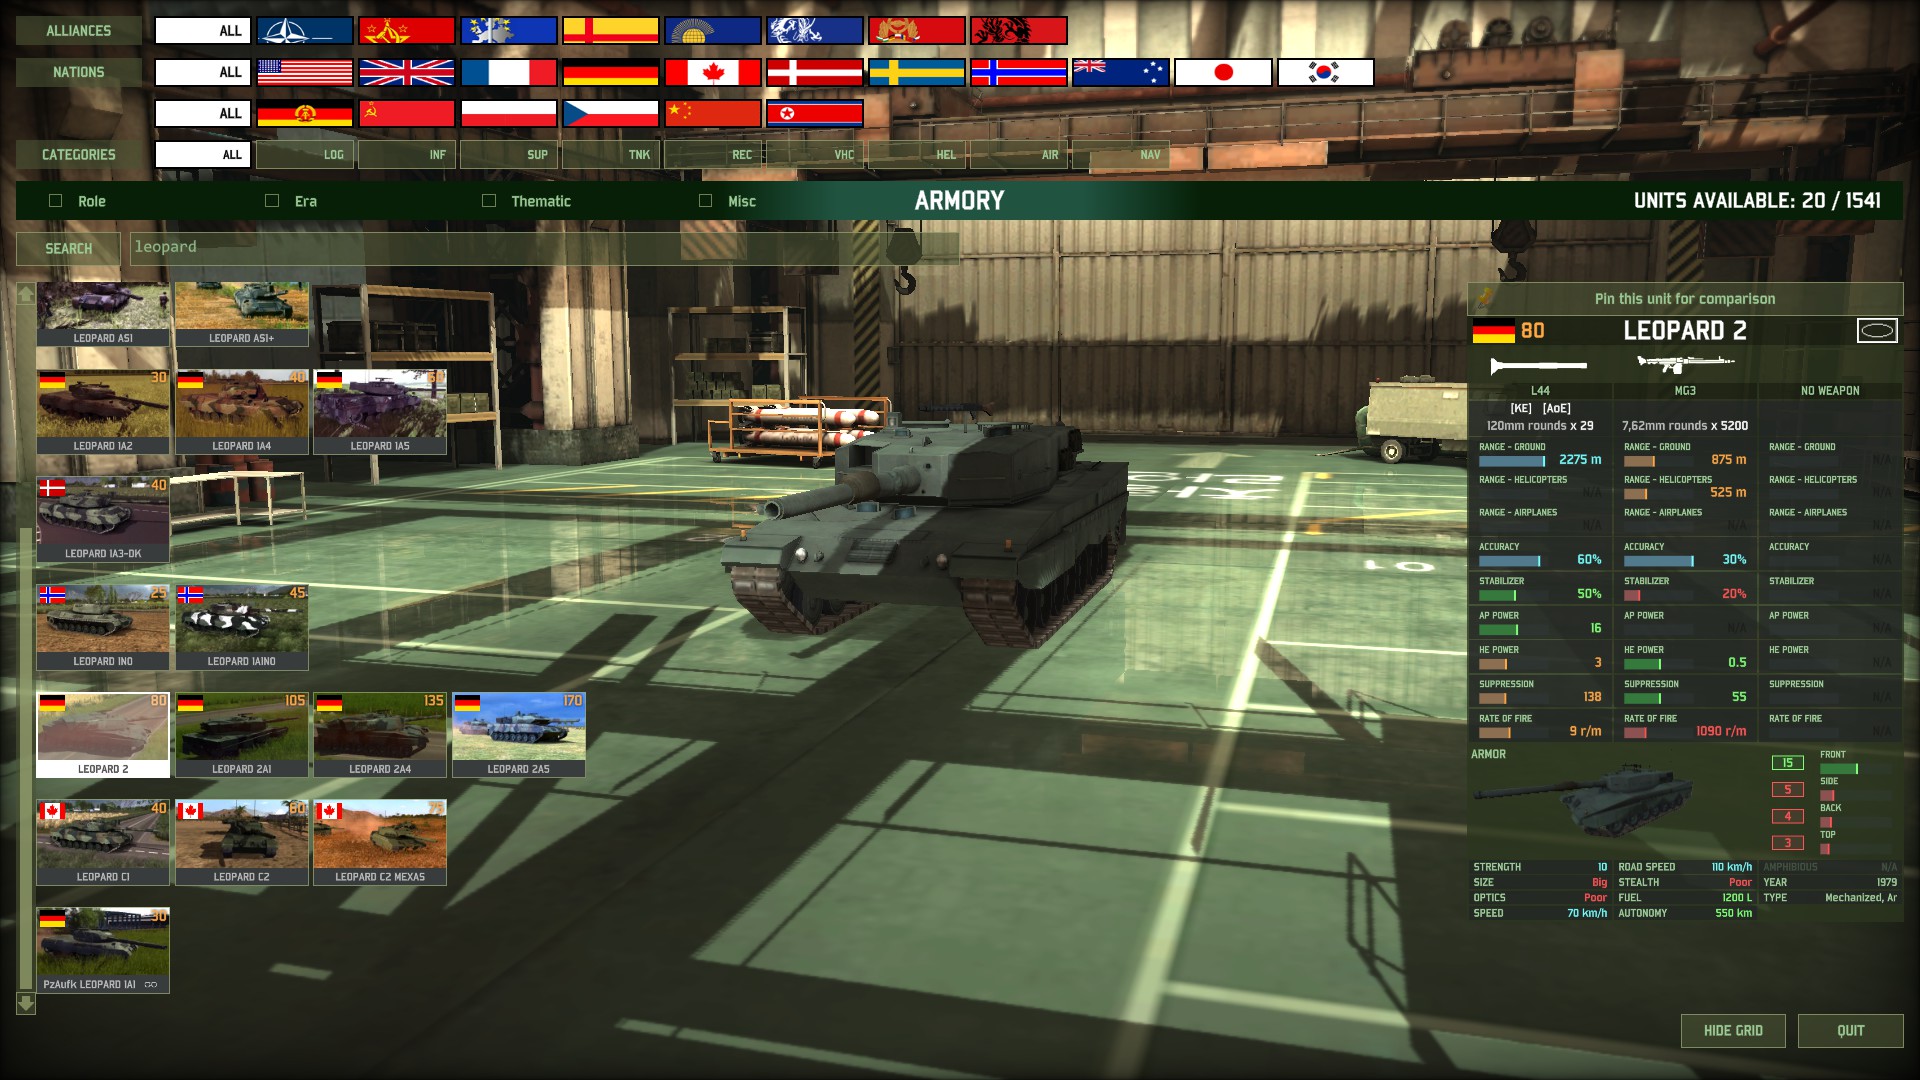
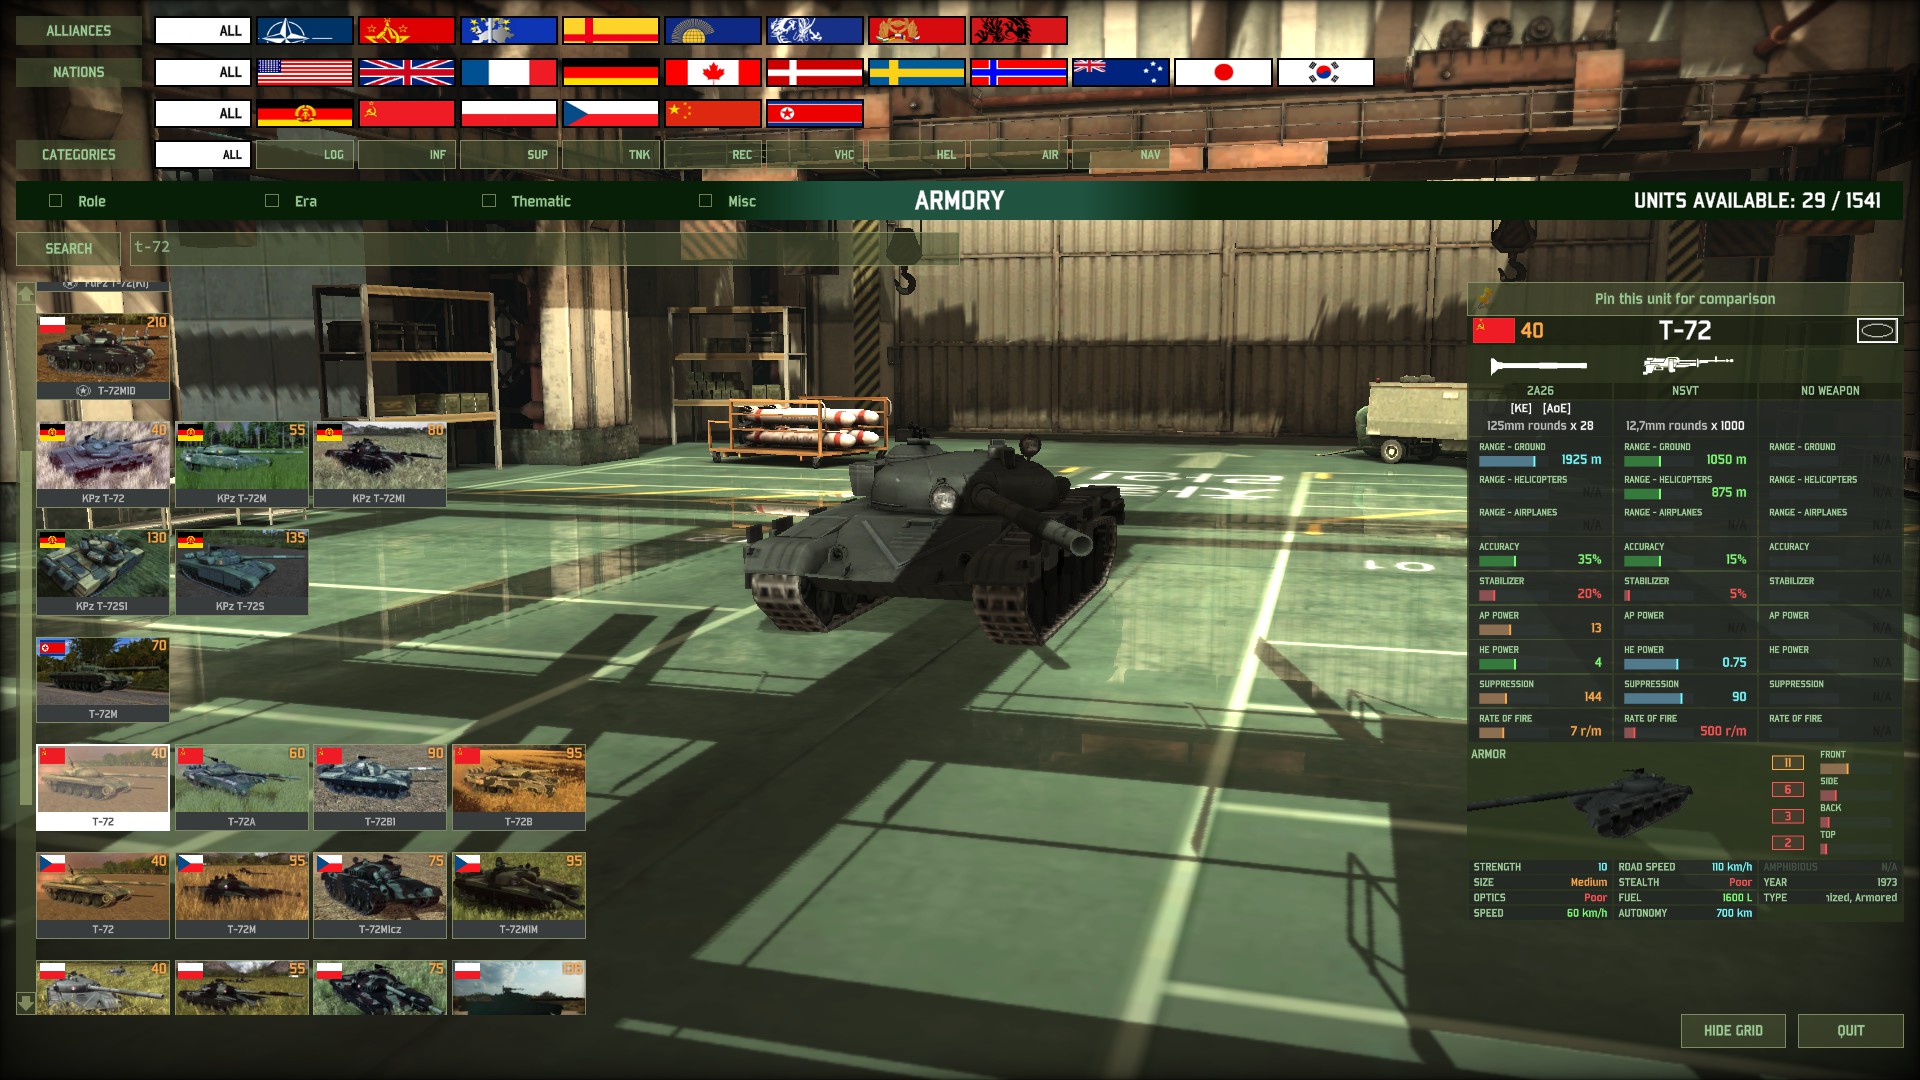
The Leopard 2 is a modern, upper mid-tier tank. The T-72 is showing its age. The Leopard 2 costs twice as much for a good reason: the Leopard’s gun has 16 AP, versus the T-72’s 11 frontal armour. At maximum range, the Leopard 2 will do 3.5 damage (calculated as (16-11)/2+1), enough to destroy the T-72 in three shots. The T-72’s gun has 13 AP vs the Leopard 2’s 15 frontal armour, and hence, won’t even scratch the Leopard’s paint at maximum range: (13-15)/2+1 equals zero damage. Note the words “frontal armour” and “maximum range”. Vehicles have less armour on their sides and rear. And both tanks are armed with [KE] guns, meaning they do more damage at close range. So the T-72 should use terrain and hide in ambush in order to shoot the Leopard 2 point-blank or from the side. Conversely, the Leopard 2 should stick to the open, where it can use its superior speed, range, and firepower to kite the T-72.
A quick guide to the campaign

AirLand Battle and Red Dragon offer dynamic campaigns that work a little like the original Shogun or Medieval: Total War. Armies take turns moving on the strategic map, and when opposing battlegroups move into the same province, this triggers a battle on the tactical map. Here are a few basic tips:
* If you’re playing AirLand Battle, I highly recommend this official campaign guide. Red Dragon’s campaign is a bit better documented in-game — check the tutorial section.
* Remember your victory conditions. Campaigns #1-#3 in AirLand Battle and #2 and #4 in Red Dragon place you on the strategic offensive: time is of the essence. Campaign #4 in AirLand Battle, “War in the North”, places you on the strategic defensive, and encourages you to stall for time.
* Keep your troops alive. In AirLand Battle, you can’t replenish depleted battlegroups: once your planes, helicopters, and high-end tanks are gone, they’re gone. Red Dragon allows you to replenish depleted units, a process that still takes valuable time and income.
* In AirLand Battle, watch your battlegroups’ “Morale” and “Initiative” stats. Morale affects how many casualties a battlegroup can take before routing; initiative affects how many units it can deploy. Winning battles increases morale. Any battle, win or lose, reduces initiative. Even well-equipped battlegroups become vulnerable if their morale and initiative are low. Use this to your advantage: use strategic-level strikes to soften up enemy battlegroups at the same time you launch a big push, or swarm the enemy with multiple friendly battlegroups.
* In Red Dragon, airpower is your friend. The “mix and match” battlegroups in the Red Dragon campaign may not always have adequate AA cover. If the computer has inadequate AA in a province, send in the pilots!
* There is a trade-off between battlegroup mobility and firepower. The two games work a bit differently here:
AirLand’s marines can land in coastal provinces and paratroopers can drop anywhere on the strategic map, but beware! These units are lightly armed, and landing them in defended provinces is extremely risky: they will be unable to deploy aircraft or additional troops until they capture a reinforcement sector. If they lose the battle, they’ll surrender (as they have nowhere to retreat). Don’t do this, unless the defender is extremely weak and you are sure the potential reward justifies the risks.
Using marines is easier in Red Dragon, as the addition of naval units gives them much-needed support. On the other hand, units with 2 initiative can’t move and attack in the same turn, and this includes many tank units! Instead, move them into an enemy province and hit “end turn”; the battle will take place on the computer’s turn instead. The computer will have the chance to reinforce the province, which produces a trade-off between slow, powerful tanks and zippy flying columns.
* The campaign difficulty in Red Dragon seems to be mis-labelled. The general consensus is that campaign #2, “Bear vs Dragon”, is the hardest because it gives the player outdated units. Consider skipping it until you’re more comfortable with the game.
* When you’re ready, try campaign #4 in both games. AirLand Battle’s War in the North is a big, non-linear experience that shows off the dynamic campaign at its best: you can find my Let’s Play here. From what I’ve heard, Red Dragon’s Climb Mount Narodnaya is similarly good.
Appendix: Starter decks
For your first deck, I recommend narrowing down the available choice, either by nation or by deck category. My top pick is West Germany, which offers a well-balanced range of units, powerful tanks and support vehicles, and good, cost-effective infantry.
Below, I’ve created sample decks for AirLand Battle and Red Dragon. The two are pretty similar, although I’ve updated the Red Dragon deck to reflect that game’s new units and stat changes. You can import the Red Dragon deck into your game using the following code:
HXhQ8yfCPS1s2shtYeZawSvm0Bq+CZ1I0zrGpnWNGMGjSwJPksgZcSCFgjRxsxHqWOJIC6SRxd4kaI/FYmt1Lyh5HkpeUPO4DiRPQA==
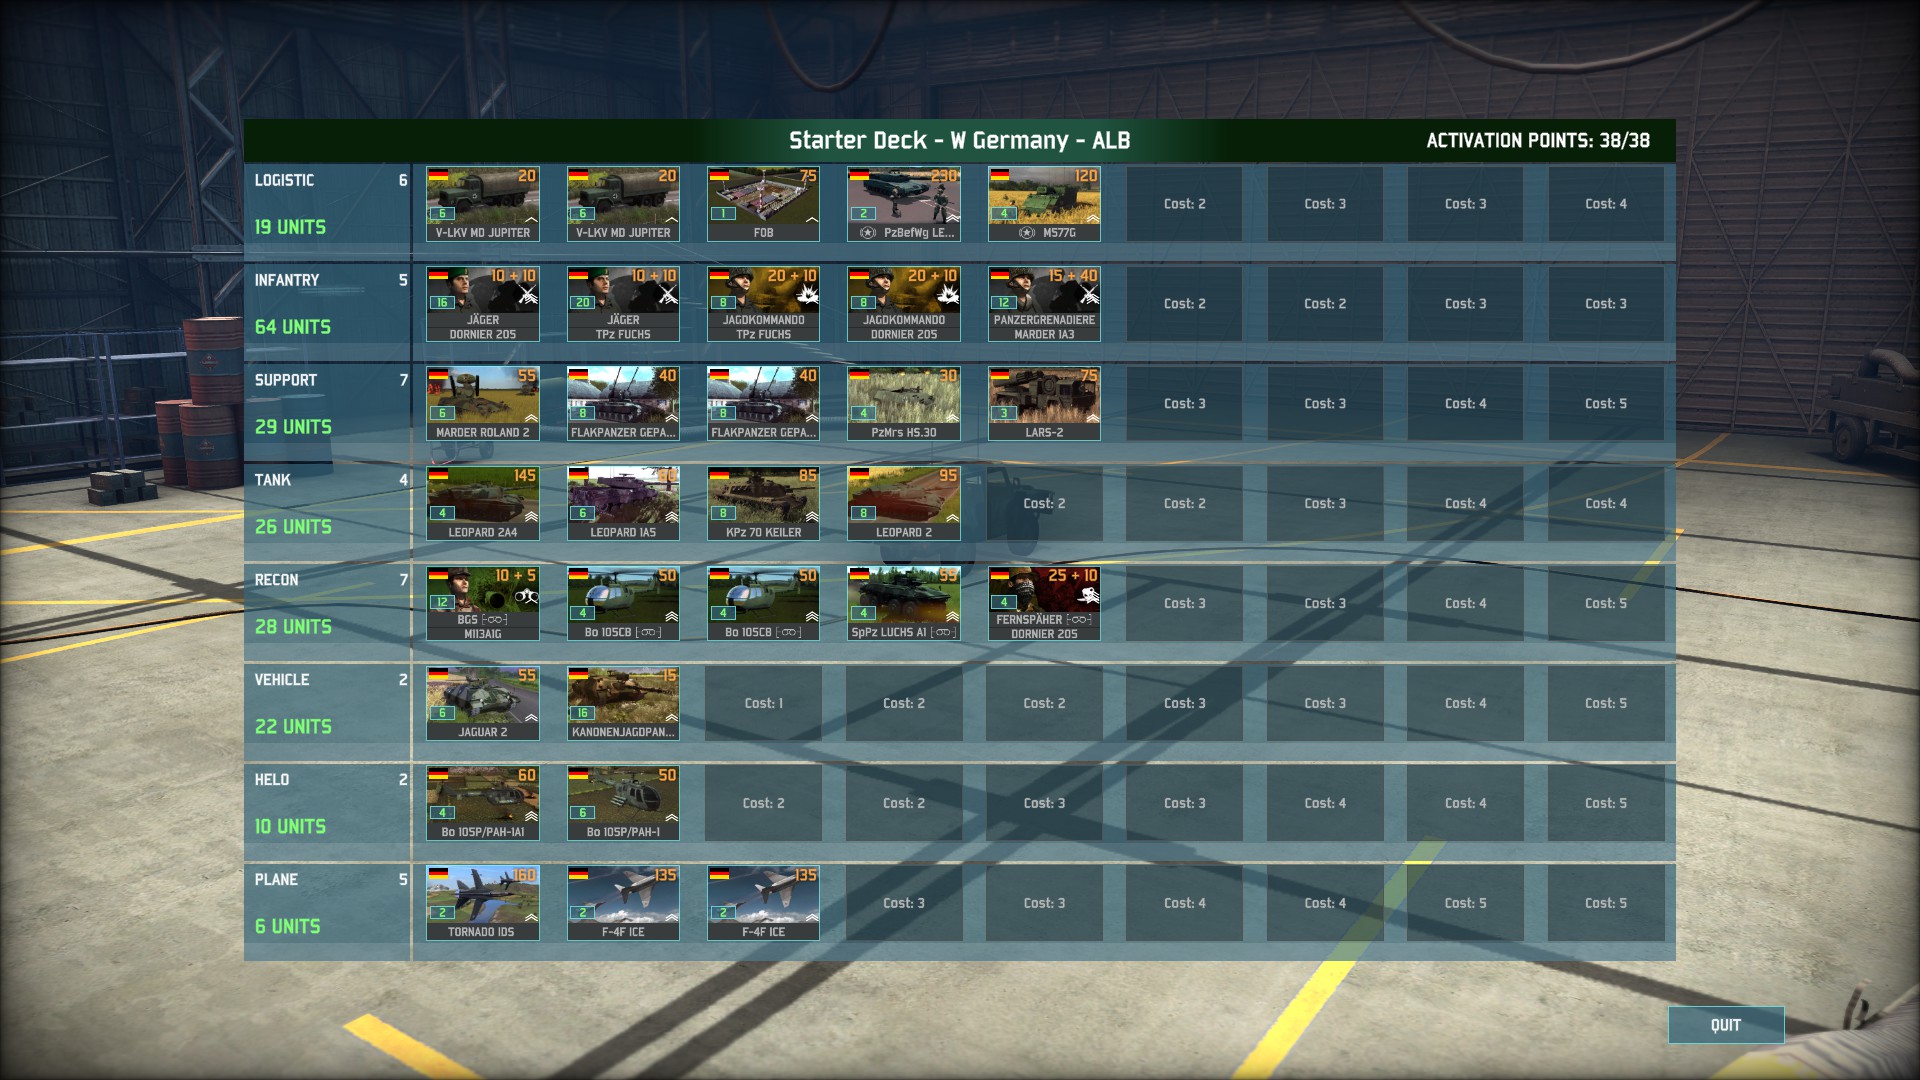
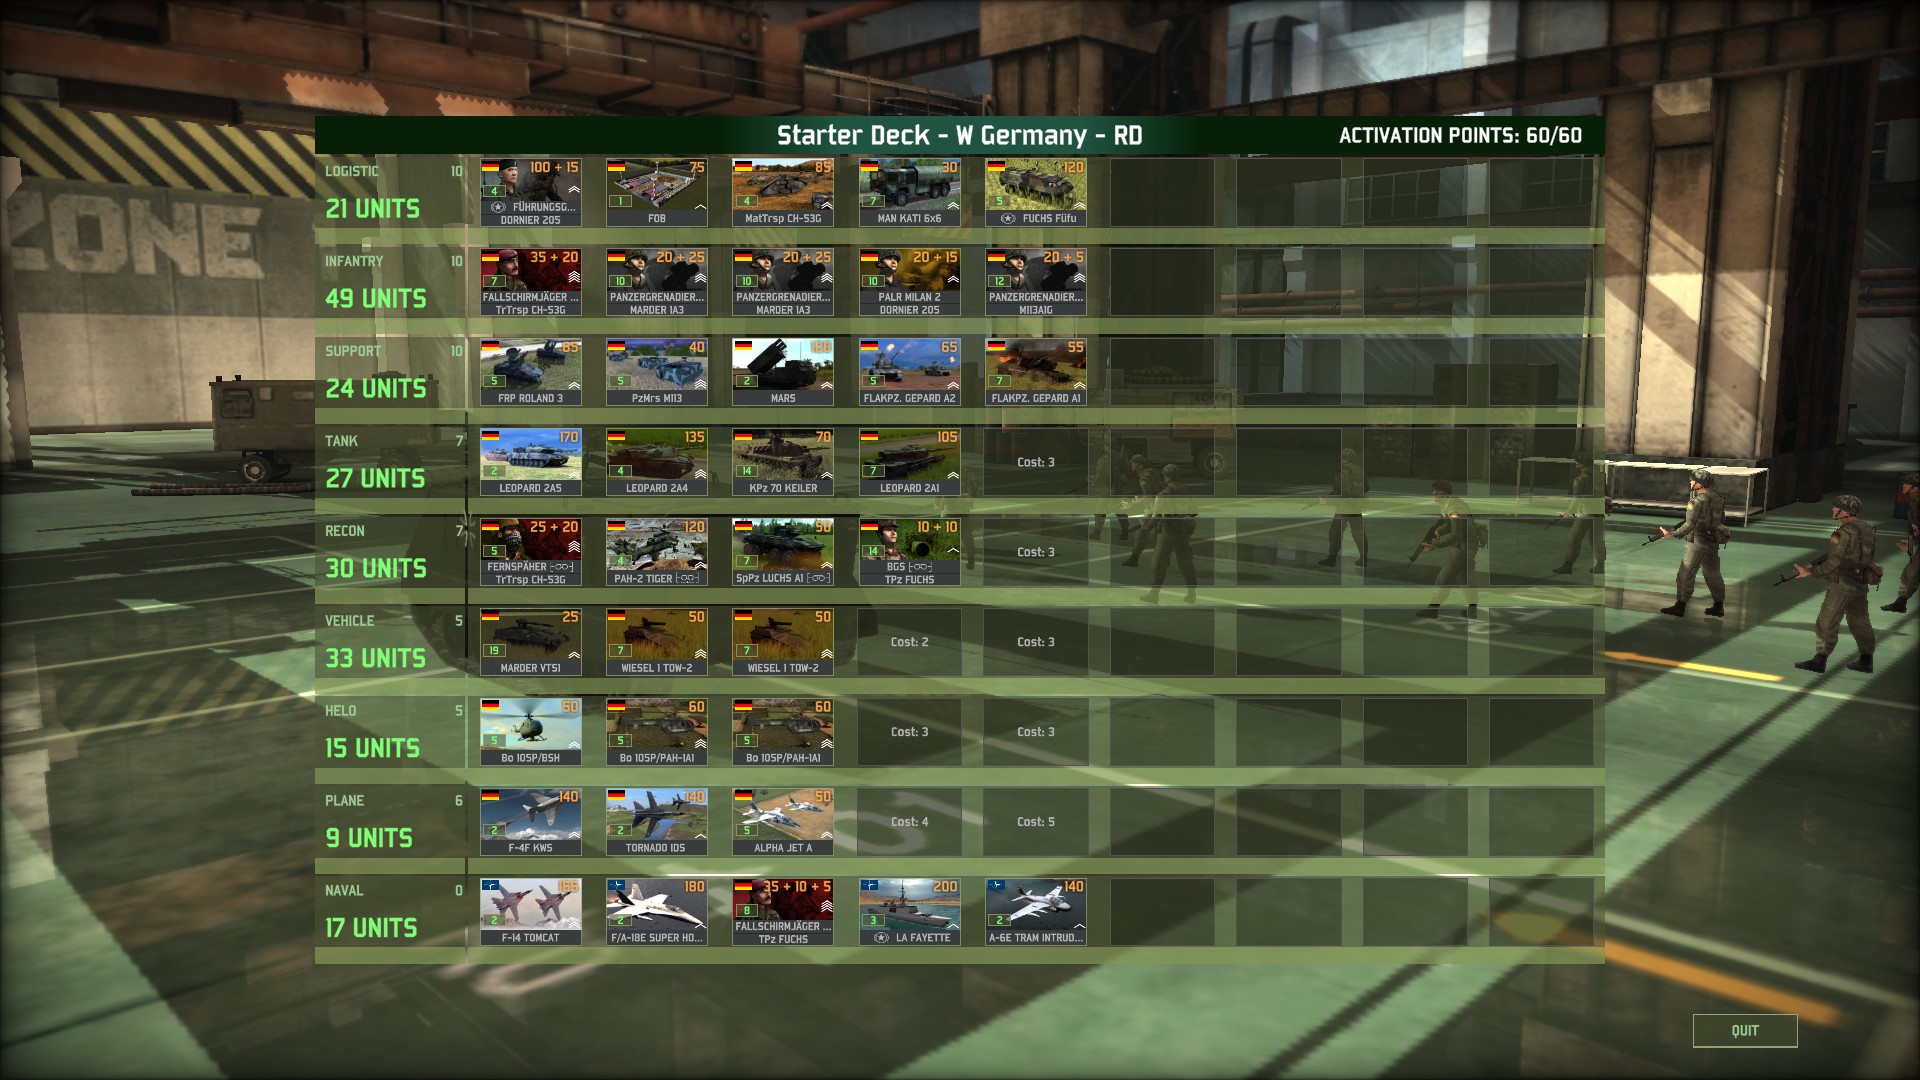
Logistics: Use the M577G (AirLand) or Fuchs FuFu (Red Dragon) as your general-purpose command vehicle. In AirLand, use the command Leopard to secure hazardous sectors in Conquest. In Destruction, you can probably get away with deleting the Leopard. For Red Dragon, I’ve replaced the command Leopard with command infantry in a helicopter for speedy deployment.
Infantry: I’ve included several types of infantry and several types of transport, to suit the situation.
In the AirLand deck, Jagers are regulars, Panzergrenadiere are elites, and Jagdkommandos are cheap and cheerful anti-tank troopers. As for transports, the Dornier 205 is a generic transport helicopter; use it to grab territory at the beginning of a match or if you need to drop off urgent reinforcements — Jagdkommandos work particularly well for this. The Fuchs is a fast APC; use it for the same purposes as the Dornier. The Marder 1A3 is a special case; it carries an autocannon effective against soft units such as other APCs, plus a limited supply of one of the nastiest anti-tank missiles in the game. Hide it behind a tank so it can fire safely.
Pricing changes in Red Dragon mean that the infantry now comprises almost entirely Panzergrenadiers. The anti-tank troopers now carry the upgraded MILAN 2 missile, and the helicopter infantry role has been taken by the elite Fallschirmjagers.
Support: The Roland and the Gepard are both anti-aircraft units – the Roland specialises in dealing with planes, while Gepard can be used against planes or helicopters. Both use radar, so watch out if the enemy is flying anti-radar SEAD planes. The PzMrs mortar carriers will be the bread and butter of your artillery; use them to suppress enemy units or lay down smoke. AirLand’s LARS-2 is a rocket artillery piece that works like a giant shotgun — you will never kill anything with it, but it can stun units in a wide impact area, buying precious seconds for your other units.
The Red Dragon deck relies on upgraded versions of the same units. The major change is the inclusion of the MARS, which loses the ability to damage infantry in exchange for greater effectiveness against vehicles. If you see enemy artillery fire coming from a particular area, it may be worth lobbing some MARS rockets back.
Tank: In AirLand, the Leopard 2A4 is NATO’s top of the line tank, probably best kept in reserve until the decisive moment. I tend to get much more use out of mid-range tanks such as the Leopard 2 and the Kpz70 Keiler. The Leopard 1A5 is a “glass cannon”, perhaps best used to kite weaker tanks, or ambush stronger tanks.
Again, the Red Dragon units are pretty much a straight upgrade from their AirLand counterparts. The Leopard 2A5 becomes the expensive supertank, supported by the 2A4, 2A1, and Keiler.
Recon: The Luchs A1 is a fast recon vehicle. The BGS is a cheap defensive recon unit — scatter it around to make sure nobody can sneak up on you. Conversely, the Fernspaher is a stealthy recon unit best used in multiplayer to infiltrate enemy lines (for extra stealth, turn off its weapons). You may be able to safely delete it in SP.
The Bo105 recon helicopter in the AirLand deck is perhaps best used at the start of a match to peek at the enemy opening (and, in multiplayer, make sure you’re not about to be rushed); after that I like to use it defensively.
For Red Dragon, I’ve replaced the Bo105 with the Tiger, a powerful, stealthy multi-role helicopter. Micromanage the Tiger for best results.
Vehicle: The Jaguar 2 (AirLand) and Wiesel TOW 2 (Red Dragon) are tank destroyers with thin armour but a powerful missile; hide them behind well-armoured tanks for best effect. The Kanonenjagdpanzer (AirLand) and Marder VTS1 (Red Dragon) offer a HE3 gun for a cheap price, making them good choices for infantry support.
Helo: Both decks feature anti-tank versions of the Bo105 helicopter, best used defensively. For Red Dragon, I’ve added an anti-air version of the Bo105, best used as a mobile reserve against enemy helicopters.
Plane: Armed with modern missiles, the F-4F ICE (renamed to the KWS in Red Dragon) is your other defence against enemy planes. The other aircraft vary between decks.
In AirLand, the Tornado IDS is a counter to high-end tanks. I suspect it would be best used flying in loops behind friendly lines, so that the pilot can lob long-ranged missiles without having to overfly the enemy AA net.
In Red Dragon, the Tornado instead carries bombs, best used against infantry and light vehicles. The Alpha Jet is a cheap napalm bomber; call in several at a time and use them against entrenched infantry.
Finally…
A big thank-you to the denizens of the Wargame threads at Broken Forum for providing sparring partners, strategy discussion, and feedback on my sample decks.
Thanks also to the denizens of the old Wargame thread at Quarter to Three, who gave me the idea of jumping straight into skirmish with an AI sidekick.
I also drew upon Xerxes17’s stats guide, one of the best references available.
Other resources consulted include Reddit, Something Awful, and the official forum and website.
AirLand Battle comments based on a press copy supplied by the publisher. I paid for my copy of Red Dragon out of my pocket.
Enjoy the site? Subscribe below to receive email notifications:
Discover more from Matchsticks for my Eyes
Subscribe to get the latest posts sent to your email.
Great Guide, thanks
what is the max unit spawn
I have the impression your deck code doesn’t work (says I don’t have the Netherlands, which is correct). Is that possible?
Thanks – I’ve updated the code so it works with the current version of the game! I’ve also replaced the Keiler with the Leopard 1A5. Deck is otherwise unchanged.
Great guide, I’m hoping to learn this game!
Thanks – glad you like it!