This week, I present one of the battle themes from last year’s indie hit FTL (my coverage here). It’s a catchy and cheerful song, which may just help counterbalance how sadistic the rest of the game can be! Enjoy.
Writing about worlds of wonder

This week, I present one of the battle themes from last year’s indie hit FTL (my coverage here). It’s a catchy and cheerful song, which may just help counterbalance how sadistic the rest of the game can be! Enjoy.
Happy Ne w Year, everyone!
2013 has dawned, and it’s time to review the best of last year’s games (that I played). This year I’ve opted to break from the traditional “best RPG”, “best strategy”, etc format normally used in Game of the Year rankings. For one, it papers over the vast differences that exist within any genre: Dark Souls is not Skyrim is not Mass Effect. For another, there are sometimes multiple standout games within the same genre. So instead, I’ve opted to recognise games for their special achievements. Here are 2012’s exemplars:

The best way I can describe FTL: Faster than Light, the new indie title from Subset Games, is to say it lives up to the very simple promise on its Kickstarter page (emphasis mine):
FTL is a spaceship simulation roguelike-like. Its aim is to recreate the atmosphere of running a spaceship exploring the galaxy.
To get a sense of how the typical game of FTL plays out, I refer you to my Let’s Play series – linked at the top of this post. In summary, players start at one end of the galaxy, progress through seven increasingly dangerous sectors, and finally take on the final boss at the end of sector eight. Each sector comprises a randomised mix of encounters – shops, text-based, multiple-choice quests (think King Arthur: The Roleplaying Wargame, or maybe a much simpler Space Rangers 2), hazards such as asteroid fields, and most of all, hostile spaceships. Combat is a frenetic homage to movie and TV space battles, as you juggle power between shields and engines and weapons, order your crew to fix hull breaches and extinguish fires, target enemy subsystems, and oh god Mr Chekov will you knock out their missiles before they kill us all?! (Since the game only gives you one save slot, you cannot reload if you die unless you back up your save file, aka “savescumming”.) Afterwards, you use scrap from your enemies’ hulls to upgrade your ship and buy fuel and repairs. Ultimately, you escape to the next sector one step ahead of your foes, and begin the process again. The typical game takes about an hour or two to play, and for most of that time – specifically, for sectors one through seven – it is a delightful roller-coaster of excitement and panic and elation.
Where FTL falls down is its endgame, sector eight, which finally trips over the line between challenge and frustration. The end boss suffers from several related problems:
1) The boss isn’t merely more difficult than anything else in the game. It’s an order of magnitude more difficult.
2) The sheer length of the boss battle. Most battles are in the game are over in 2-3 minutes. However, the boss’ defences are so strong that all up, it took me something like 40 minutes to beat! The game’s combat system is built for short, sharp fights, and it bogs down when it takes that long to get through one opponent.
3) The need for luck to beat the boss. This manifests in two ways. First, since equipment, and shop catalogues are random, it’s possible for a player to reach the boss without the tools needed to win. Second, as my experience in part 4 of the Let’s Play showed, the length and difficulty of the boss fight increase the odds an unlucky hit will scupper all your work.
4) The inability to save/reload, which becomes a liability here. If things go wrong 80% of the way through the boss fight, get ready to replay aaaaaall the way from sector 1.
Net effect: I feel absolutely no shame over savescumming to beat the boss, and while I could replay the game (unlocking and then trying out different spaceships, attempting different builds, etc) – I don’t want to. There are players who feel motivated to defeat that final boss over, and over again. I am not one. And that is a real disincentive for me to spend any more time with FTL.
Still, while FTL lasted, it and I had a wonderful ride. As with 2010’s Recettear, FTL is short, sweet and clever. It’s not perfect, but the core mechanics for 80%-90% of the game are sufficiently strong to outweigh the annoyance and tedium of the remaining 10%-20%. Well worth checking out, and I look forward to seeing what its creators do next.
We hope you enjoyed this post! To quickly find this post, and our other reviews, click the “reviews” tab at the top of this page.
Resources
The basis of my review
Time spent with the game: I estimate 8-10 hours.
What I played: Four playthroughs on Easy (one won), using the Kestrel.
What I didn’t play: Normal difficulty. The other spaceships in the game.
Captain’s log, starship Kestrel
Stardate 2012.09.22
Sector Seven: Zoltan Homeworlds, Continued
When we left off, I was debating which piece of equipment to leave behind in order to pick up a shiny new hull-smasher laser. In the end, I ditch my unused anti-ship drone. I have only limited power available for the drone control unit, and I want to focus on the life-saving defensive drone.
We make it to the end of Sector Seven without incident.
Sector Eight: The Last Stand
This is it, the cusp of the final showdown. This is what the sector looks like. The Rebel flagship is the ominous red shape just visible at the far left:

On the way to fight the flagship, we come to the rescue of a beleaguered Federation squadron under attack by the Rebel:

This time I remember to turn on the defence drone at the start! The Rebel does little damage as a result, and the grateful Federal survivors hand me some supplies. I back up my save again, and carry on. A second Rebel is just a speed bump, and then it’s onto the flagship.
Here we go.

The fight is long (my Dxtory recording comes to over 30 minutes!) and, to be frank, a bit tedious once I’ve destroyed most of the flagship’s weapons. At this point, I just have to wait for my weapons to do enough damage. However, the tipping point comes once I use my Mantis boarders to whittle down the flagship’s crew, at the same time I use the fire bomb I purchased back in sector 6 to set the flagship’s med bay alight. This prevents the crew from simply running away from the Mantes, healing up in the med bay, and running back to pick off my weakened boarders. Even then, it’s chancy – I lose my second crewmember this game, Mansvik the Mantis – but his sacrifice isn’t in vain. Eventually, most of the flagship’s crew is dead, save for one gunner in the forward compartment. Mopping up is easy after that.

At the end of the fight, the battered flagship jumps away. I back up my save yet again, and prepare to give chase.
… and die horribly when my cloaking device – the key to my survival! – gets knocked out by an unlucky hit. This is why I backed up the save, because I’m not starting this LP (or playing that half-hour flagship battle) again.
Let’s try that one again.
This time it goes much better. A quick barrage of firebombs, and Sem the surviving Mantis, take care of most of the flagship’s remaining weapons. I dust off my anti-boarder drone, and that takes care of the boarding drones the flagship sends my way. The cloaking device stays intact, and I can survive the worst the flagship throws at me. Soon the battle is over. I back up my save once more, spend the last of my scrap, and head off to fight the third and final phase of the flagship.
I have to reload twice – this time, the flagship carries Zoltan shields that prevent me from quickly disabling its most dangerous weapon, a triple missile launcher, with my boarders/firebombs. In the time it takes me to lase the shield down, the flagship pulverises me. Cloaking barely helps, as using the cloak against the missiles meant it wouldn’t be available against the flagship’s special attack, and vice-versa. But on my third attempt, I pull it off! Eventually I bring down the flagship’s shields, and soon after, the missile launcher. Once the launcher is out of commission, it’s smooth sailing.

The high score table looks like this. The duplicates are the result of my savescumming (somewhat disappointingly, winning the game doesn’t confer extra points; oh well):

And that’s it for this playthrough! For players who want to try saving the Federation again, beating the flagship unlocks a new ship type, the Federation Cruiser. (There are nine ships, plus variants, in the game – so there is room for completionism.) But for now, I think I can rest on my laurels and proclaim myself done with FTL. Thank you for following along, and I hope you had as much fun as I did!
Captain’s log, starship Kestrel
Stardate 2012.09.22
Sector Four: Engi Homeworlds, Continued
The Kestrel’s exploration of Sector Four continues, with mixed results.
The good news: beefing up my weapons, and being willing to fire off a missile at the start of combat, have paid off. The next enemy I encounter goes down in flames.
The not quite so good news: the next shop I find is a re-run of the previous one. It has a drone control and crew teleporter for sale, but I don’t have enough scrap to buy anything without selling my spare equipment. This time I grit my teeth, sell a spare missile launcher, and buy the drone control unit. At least I can get some immediate use out of it. Hopefully I’ll find a crew teleporter – and some crew to actually teleport! – later in the game.
I make it to the exit with the Rebel hot on my heels, and head into Sector Five.
Sector Five: Rebel-Controlled Sector
The drone control unit promptly pays off, when I answer a distress beacon:

Sending in the drone leads to a little bit of hull damage, but I earn 42 scrap as a reward. At the next beacon, I take on a quest that requires me to travel to the far top-right corner of the sector:

Along the way, I deal with a Rebel scout before it can jump out to warn the fleet of my presence, fight off a boarding party with a big helping hand from my anti-boarder drone (good thing I bought that control unit!), and find a shop with both a crew teleporter and recruitable crew! I hawk an unused repair drone to pay for the teleporter and a Mantis of my own, name of Sem. Remember, Mantes are the hand-to-hand specialists of the game, so this should give me a big edge in boarding actions.
I take the time to play around with the Kestrel’s loadout:

The weapon on the far right is a healing bomb, which I can deploy (at the cost of 1 missile ammo) to either my own ship or to an enemy ship to heal friendly crew in the vicinity. That means I can send over, say, Sem the Mantis and King the Rockman to slaughter the enemy crew, teleport in healing bombs as necessary to keep Sem and King alive, and then earn more scrap from capturing the enemy ships alive!
Completing the quest lets me offload some drone parts for scrap, and defeating another Rebel gives me enough scrap to return to the shop and hire an Engi crewman named Maradine:

On my way to the exit, I run into a Rebel who gives me a taste of my own planned medicine and boards me. Sem, King, and my drone deal with the boarders, then Sem and King head over for some payback.
The first try does not go as planned, thanks to a certain Captain forgetting to actually charge the healing bomb before sending Sem and King over. I quickly teleport the two almost-dead crewmen back, heal them up in the medbay, then send them back. The enemy ship has no medbay, and the enemy crew has had no chance to heal. The second trip goes much better. The scrap I earn from the intact, lifeless Rebel ship (60+) is about double what I’d have previously earned.
I make it to the exit, and onto Sector Six.
Sector Six: Rebel-Controlled Sector (another one)
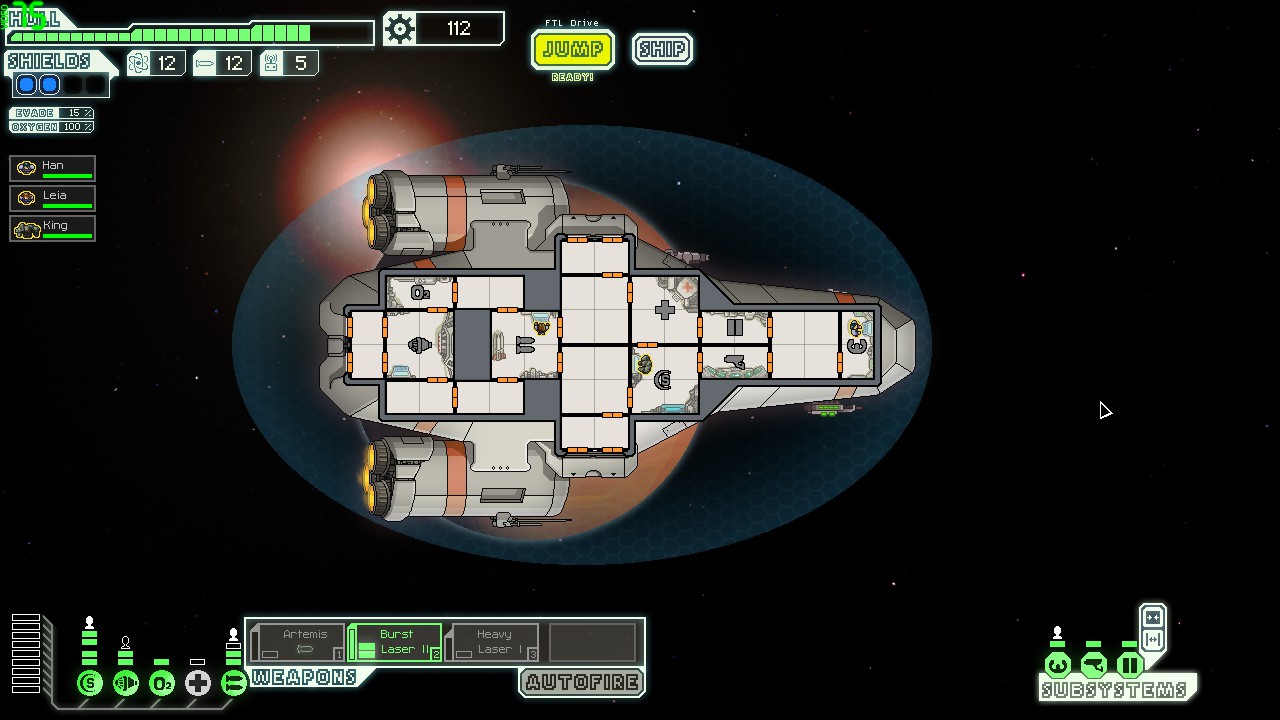
The first few Rebel ships I encounter are AI-controlled, and hence pointless to board (as well as dangerous; they have no oxygen!). My luck turns when I run into a Rebel whom I can board. Killing the enemy crew (one of whom, I notice, is named Geryk) lets me liberate a Mantis prisoner named Monsvik, who joins my growing team. This is good – it lets me form a dedicated away team of two Mantes, while King the Rockman can stay back and man the Kestrel’s shields.
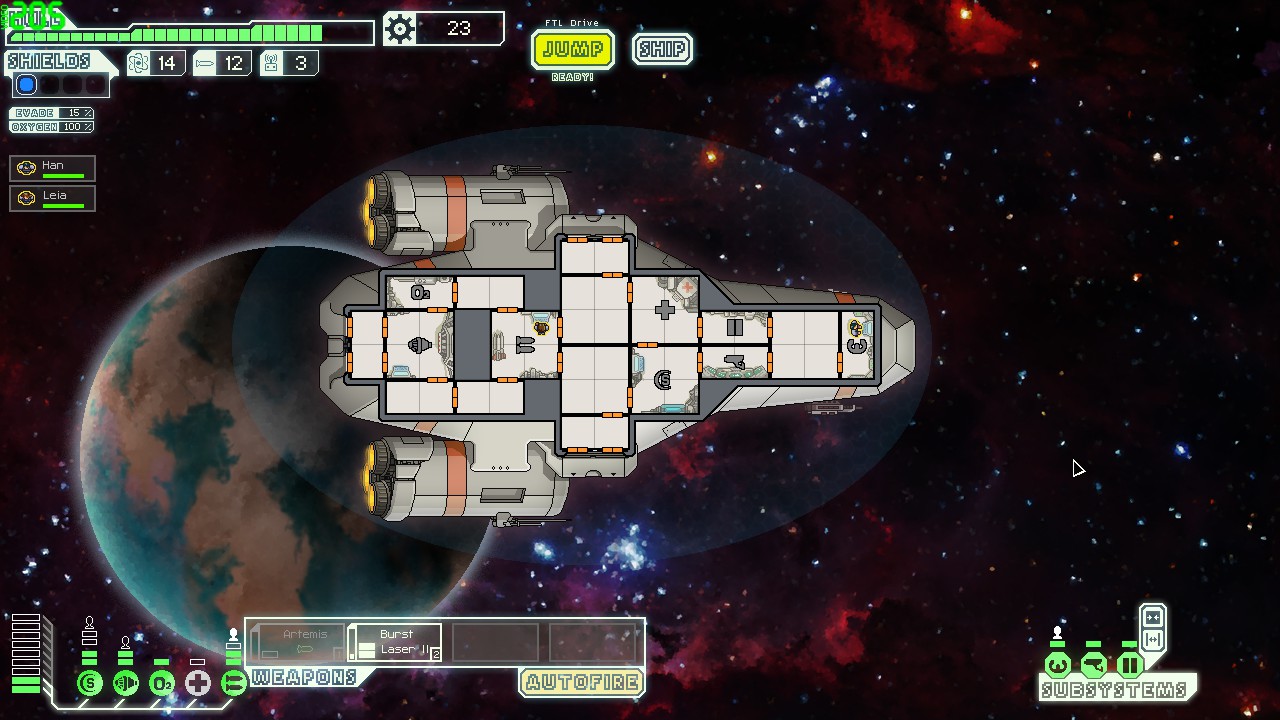
At the next shop I encounter, I pick up a fire bomb in preparation for a certain battle later in the game. I also sell my venerable heavy laser and pick up a level 1 burst laser instead – the heavy laser does 2 damage to hulls but only 1 to shields, whereas the burst laser fires twice, dealing 1 damage per shot and granting a second chance to hit. The Artemis missile launcher goes into storage:
The new configuration seems to work well, letting me chew through enemy shields while preserving precious missile/bomb ammo. With my newfound love for boarding actions, I upgrade my sensors so I’ll be able to map out the enemy crew. Sector Six ends without incident, as I again just barely beat the Rebel fleet to the exit. I’m getting better at this!
Sector Seven: Zoltan Homeworlds
We’re almost there. Just this, and then the gauntlet in Sector Eight. Stay on target. Stay on target…
Our first encounter is hostile, as a Zoltan ship shoots first and asks questions later. Luckily, its defences are poor. My pre-ignited lasers make short work of its shields and weapons, and injure the crew. Then, since Zoltan are lousy in boarding actions, my Mantes teleport over to finish the job. When the dust settles, I have more scrap than I’ve ever seen in one place. And luckily, there’s a shop right next door:

I refuel, and buy a level 1 defence – i.e. anti-missile –drone. Seeing another shop right after that, I head over… and see a level 2 defence drone. Oops. The level 2 requires more power, but is also more useful, meaning I wasted the scrap on the level 1 drone. Oh well. I trade it the level 1 and buy the level 2. I then promptly forget to upgrade my drone control unit, leaving me unable to use my new toy.
One battle later, it ceases to matter. After killing the enemy boarders, setting their spaceship on fire, and lasing the surviving crew to death, I’m swimming in scrap again (240 scrap). So much so that when I get the option to pick up a new augment, a “reverse ion field” that gives me a 20% chance to shrug off incoming ion fire, I ditch my scrap recovery arm (+10% to collected scrap). This close to the end, I want maximum survivability.
The next fight chews me up badly – the enemy is strongly shielded and armed to the teeth, with a missile launcher and assorted lasers. My defence drone II would have protected me– had I remembered about it. Eventually I do turn it on, resulting in a much easier fight… only for the enemy to flee before I can administer the coup de grace. No reward.
Crushing the next enemy, and harvesting plenty of scrap from a random distress beacon, provide some solace. One jump away from the exit to the final sector, I get into another tough scrap, but walk away with a new piece of loot: a level 2 hull smasher laser, a more powerful, less energy-efficient cousin to my starting burst laser. I’ll have to drop something to pick up the hull smasher laser, but what?

On that note, as I mull which piece of kit would be most useful against the final boss, it’s time for me to wrap up this instalment of the LP. And to hedge my bets, I finish by backing up my saved game (aka save-scumming). This goes against the intent of the designers – FTL only allows you a single, automatically overwritten save slot – but this close to the final boss, I’d like the ability to retry different tactics, and different loadouts, without starting again from scratch.
I’ll see you at the final battle.
Captain’s log, starship Kestrel
Stardate 2012.09.22
Sector Two: Pirate Space, Continued
When we left off, the Kestrel was in good form: decently armed and shielded, with enough fuel and supplies and scrap to last a while. I decide to make the most of it by looking for trouble. It’s time to head into the nebula.
After steeling myself that way, the rest of Sector Two ends up as an anti-climax. I fight off two separate boarding parties in the nebula by the simple expedient of rushing my crew into the med-bay, where they heal faster than the boarders can hurt them. The only hostile ship I meet lacks the firepower to pierce my upgraded shield, resulting in a decidedly one-sided fight. Buying a scrap recovery arm (which gives me +10% to all future scrap income!) rounds off my time in the sector. With the Rebel hot on my heels, I briefly debate looking around a little more, but eventually decide to play it safe. Off to Sector Three we go!
Sector Three: Engi-Controlled Sector
The aptly named Engi are a race of sentient machines, lousy in hand-to-hand combat but great with repairs. They’re also friendly to the Federation, which makes Engi space that much more pleasant to traverse.
Right off the bat, I hit the jackpot. An Engi ship, thinking I’m a pirate, hastily offers up its cargo of scrap. I demur, telling them I’m friendly:

But the Engi go ahead and offer me the scrap anyway, to help me on my long voyage.

Thanks, Engi! And it’s a good thing, too – I’m perilously low on fuel. The red-highlighted “2” in the top-left means I only have enough fuel for two more jumps! One jump away there’s a shop… and there, I find a cloaking device for sale. I want that cloaking device, but buying it would consume most of my scrap, leaving precious little for fuel.
I roll the dice and buy the cloaking device anyway. And a couple of jumps later, my gamble pays off when I first hoover up some more scrap, then – just as I was about to run out of fuel – find another shop. The whole crew probably heard my sigh of relief!
The rest of the sector proceeds smoothly enough, with the Kestrel able to easily defeat foe after foe. It goes so smoothly, in fact, that I get a bit cocky and end up taking too much time to explore. When I finally make it to the exit, the Rebel is waiting for me. And for the first time during this playthrough, I run from a fight. The Artemis missile launcher comes into play just long enough to disable the Rebel’s weapons, and then once the jump drive is charged, it’s off to Sector Four.
Sector Four: Engi Homeworlds
On my first three runs, I spent scrap as fast as it came in to upgrade the Kestrel. This time I’ve been saving up, and now it pays off. Right off the bat, I find a shop, and this time I hit the jackpot. Specifically, the shop sells a weapon pre-igniter, which will allow me to begin a battle with fully charged weapons, and an ion blaster, which will allow me to efficiently disable enemy systems. Combined with my burst laser, I should be able to start a fight by taking down the enemy shields with my pre-ignited arsenal, then ripping apart the enemy’s weapons. After that, all I should have to do is mop up. Should.
Then the next few enemies I meet teach me about the dangers of assumption:
Specifically, “starting a fight by taking down the enemy shields with my pre-ignited arsenal” only works if I actually have the firepower to take down the enemy shields. But as of Sector Four, the enemy ships are all now sporting 2 points of shields – on a par with my own. With a burst laser 2, a heavy laser, and an ion blaster, I could punch through level 2 shields if I fired every weapon at once, and hit. But at first, I lack the power to actually fire all these weapons, and I can’t count on guaranteed hits! The bottom line: the enemies have more time to hurt me, often with newer and scarier weapons, before I can silence them.
By the time I make it to the next shop, several jumps later, the Kestrel looks like this:

Not only am I almost out of fuel again, but the “Hull” bar in the top-left is now yellow, less than half-full. If that reaches zero, it’s curtains for the Kestrel. That I owe to a Rebel with a missile launcher, which ignores my precious 2-point shields! It took my own last-ditch missile – not the starting Artemis, but a hulking breach launcher I picked up along the way – to save the day.
With the Kestrel in for some much needed refuelling and repair, this is a good time to ponder battle tactics. I have a whopping 25 missiles – perhaps I should actually use them, say as part of my pre-ignited opening salvo? Buying a couple of new missiles is cheaper, and safer, than fixing a hull that’s been turned into Swiss cheese.
The shop, welcome as it is, also poses its own frustrations. Specifically, I have 112 scrap available. My priorities are repairs (38 scrap) and fuel (I want to buy the station’s whole stock, which will cost 18 scrap), totalling 56 scrap. The shop also stocks a drone control (80 scrap), which would be nice but isn’t essential, and a crew teleporter (75 scrap), which I lack the manpower to use right now, but will be essential later on. I would love to buy the drone control, the teleporter, or both, but – I – don’t – have – the – scrap! I do have some spare equipment – a couple of different missile launchers, a presently unusable anti-boarder drone – I could sell, but I don’t know if I’ll need them in the future.

With a rueful sigh, I pay for the fuel and repairs. Since I don’t want to sell anything, that leaves me with 56 scrap, enough to upgrade my ship’s reactors in lieu of buying anything else at the shop. Maybe that “first strike” tactic will work if I can throw an even bigger first volley…
With the Kestrel ready to head into the unknown again, this is also probably a good time to wrap up this instalment of the LP. After the relative ease of the first few sectors, things are getting hairy for Han, Leia and King. Will they survive their journey?! Tune in to the next part of the LP to find out!
It is a period of civil war. Rebel spaceships have overrun most of the Galactic Federation. During the battle, Federation spies managed to steal secret plans to the Rebel’s ultimate weapon, the REBEL FLAGSHIP, an armoured behemoth with enough power to obliterate an unwary player. Pursued by the Rebel armada, Captain Peter races home aboard his starship, custodian of the stolen plans that can bring victory in this game…
Captain’s log, starship Kestrel
Stardate 2012.09.20
Introduction
Three times I’ve attempted this journey. Three times I’ve failed, the Kestrel – the game’s starting ship – turned into so much space junk. Now, by the grace of the alien artefact known as the “New Game” button, I can make a fourth attempt.

For this try, I’ll use the Kestrel again. There are other ships available in the game, and I’ve unlocked one (the Torus), but I want to try to see this through with the Kestrel first. The Kestrel packs a well-rounded punch, mounting a powerful burst laser and an ammo-chewing but potentially devastating missile launcher. Once I upgrade its energy shield, it should see me easily through the first few of the game’s eight sectors (each sector is progressively harder). Its starting crew of three is too small, especially when considering there are four systems (helm, engines, weapons, shields) to be manned, but c’est la vie.
After naming my initial crewmembers “Han”, “Luke”, and “Leia”, and ensuring the difficulty is set to “Easy”, it’s time to begin this journey.
Sector One: Civilian Space

The first sector begins uneventfully. The Kestrel skirts an asteroid field, buys fuel at a space station, and ignores a distress beacon (our mission comes first!). On our fourth jump, we meet our first Rebel.
Several barrages of the burst laser neutralise his weaponry before he can do too much harm, and when he tries to flee, another barrage does the same for his jump drive. Beaten, the Rebel tries to surrender. We refuse. We need the scrap metal from his hull: scrap is the game’s currency, used for purchasing weapons, upgrading components, recruiting crew, and paying for fuel and repairs. Upgrades are life. Scrap is life. And soon enough, we have more of it. The scrap quickly goes into upgrading our shielding system, and onto the next beacon we go.
This time it’s another Rebel, a small transport. I demand surrender. The Rebel refuses, and manages to flee in one piece. I growl, and jump away to the next beacon. Upon consulting the star map, I see the Rebel fleet has now arrived in sector! The Rebel main fleet begins each sector several jumps behind the player, and it’s not a wise idea to let it catch up – running into fleet forces a high-risk, practically zero-return battle. However, I’m still well ahead, giving me the luxury of exploring the sector a bit more. A hidden Federation outpost gives me a bit of scrap and a quest to rescue a Federation base in the next sector, but my luck doesn’t hold up at the next location.

While boarding a space station to look for survivors, Luke is struck down by a fatal illness. The measly scrap I pick up seems a lousy compensation for losing one of my scarce crew.
I roll the dice again. One more look around before I head off to the next sector… and what should I run into but an enemy, a Mantis fighter.

The Mantes are vicious if they can teleport over to your ship, but luckily for me, the fighter is too small to have a teleporter. I won’t have to worry about Mantes slaughtering my diminished crew in melee! Our first salvo takes out the Mantis weapon battery, our second hits the shields, and the third reduces the Mantis to scrap. I hightail it to the sector exit one step ahead of the Rebels.
Picture of the Kestrel as at the end of Sector One
Sector Two: Pirate Space
For this sector, I had a choice of heading into either pirate or rebel space. The pirates seemed like easier foes, so off that way I went!
Along the way, I stop off to rescue the Federation base I heard about in the last sector. The Rebel ship attacking the base turns out to be just a scout – no match for the Kestrel – and soon I have not only more scrap, but a quest reward! After saving the base, I acquire a new crewman – a Rockman alien named King – and a new weapon, a heavy laser. The laser doesn’t seem too shabby, but the really big prize is the Rockman. Not only was I dangerously short-handed with only Han and Leia left, but Rockmen are great in their own right. They’re tough and immune to fire, which makes them perfect for repairing burning compartments or fighting hand-to-hand.
Soon enough, I deal with another Rebel – this one lurking inside an asteroid field – and pour some scrap into upgrading the ship’s power supply, so I can actually use the new laser. Then I investigate another distress beacon, and this time things go my way. It turns out to be a burning space station, and the Rockman promptly earns his pay:

The grateful scientists on board the station give me a new long-range sensor, and I scope out the sector:

As with Sector One, I have some time before the Rebel (the red line at the left) reaches me, so I should make the most of it. I’m in a decent position: I have an adequately armed and shielded (for the early game) ship, and a nice pool of scrap to play with. Where to next? With the sensor, I can see that the yellow triangles represent spaceships. Jumping to those locations will likely lead to battle, but the rewards (read: scrap) could be worth it. On the other hand, I could simply head into the nebula (the pink blob to the right). In the nebula my sensors would be blinded – carrying its own dangers – but the Rebel’s pursuit would also be slowed. In either case, things could go south in a hurry – or I could stumble across a remarkable find that would turn the Kestrel into a killing machine.
There is a lot of luck in this game, but that’s not necessarily a bad thing . That chanciness helps create a sense of exploration, a sense that I really am a starship captain racing through the unknown. And it often throws up interesting decisions – even if they’re as simple as, “do I roll the dice?” (see: the asteroid belt and space station back in Sector One).
But for now, I’ll have to leave those decisions for another day. “Get out while you’re ahead,” they say, and it looks like a pretty good time for me to close this episode of the LP. Stay tuned for the continuing adventures of the Kestrel, and I’ll see you next time!